 |
Incubation Thermometers |
|
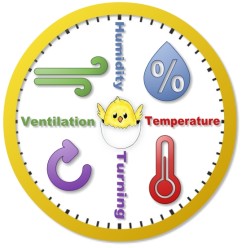
| Temperature is one of the
four key components of successful incubation and failure to maintain
the correct temperature accounts for the vast majority of hatch
failures... and poor thermometer selection is among the leading
causes of incorrect temperatures. |
 |
WARNING:
Inexpensive, digital thermometers may give the appearance
that the temperature is correct, BUT these readings are
frequently misleading. For best results, be very
selective in choosing your thermometer. |
| The purpose of
this webpage is to provide guidance in the selection and calibration
of thermometers suitable for use in artificial incubation. |
|
Why are
common digital thermometers
inadequate
for artificial incubation? |
 |
Digital dual purpose
hygrometers/thermometers are popular among backyard
hobbyists. They are readily available, inexpensive, and easy
to use. However, they are a very poor choice for artificial
incubation:
-
They cannot be calibrated:
The easiest method for calibrating home instruments is
submerging the thermometer in either a ice water or
boiling water bath. Most digital thermometers would be
destroyed by such baths. Additionally, even if they
could be submerged, they do not have a calibration
setting... their readout cannot be altered.
"I have model 00613. When
the temperature in the house is 69 degrees it says 72.
When the temperature is 75 in the house it says 73."
-
They are inaccurate:
They have an accuracy error rating of ±2.0°F meaning
that while the readout displays 99.5°F the actual
temperature can range anywhere between 97.5°F to
101.5°F.
"My Acurite 00309SBDI is
reading 72°F but it is actually 75°F (verified 75 using
a Fluke Multi-meter) I would think a device that is
suppose to tell temperature would be more accurate."
This accuracy error is in ADDITION to
any calibration error. If there is a 1.0°F calibration
error and a 2.0°F accuracy error, the incubator
temperature can be off by a full 3.0°F.
-
They have a poor response
time: How quickly a thermometer registers a
change in temperature is referred to as "response time."
Sensors encased in plastic have poor response time... it
can take up to 30 minutes for some thermometers to
respond to a change in temperature.
"It only takes about 1/2 an
hour to reflect the temp."
|
|
|
|
|
WARNING: Problems associated with high or low
temperatures are often not seen until hatch time. Poor
temperature control produces weak chicks that do not have
the stamina to hatch. Far too
often, people blame the humidity for these problems when
the real problem was temperature Days 1-18.
|
|
|
|
Effects of Temperature Variations |
|
Prolonged High Temperature |
Prolonged Low Temperature |
- early embryonic death
- blood ring (early death)
- death of embryo days 7-17
- early hatch
- extended hatch window
- small, weak chicks
- chicks with unhealed dry navel
- malpositioning
- deformities
- short wiry down
|
- blood ring (early death)
- death of embryo days 7-17
- dead in shell, not pipped
- dead in shell, pipped
- partially zipped, membrane partially torn
- late hatch
- extended hatch window
- chicks with unhealed wet navel, soft bodies
- malpositioning
- deformities
|
|
Inaccurate and
variable temperature is the major cause of hatch failure.
Chicks can develop all the way to hatch time and pip but
fail to finish. |
|
|
|
|
WARNING: Do Not Trust the gauges that came with your incubator. Verify that both the temperature and humidity readings are correct with a calibrated thermometer and hygrometer. It is recommended that this verification be repeated periodically. If there is a reading difference between the incubator panel and the calibrated thermometer, trust the calibrated thermometer.
|
|
|
|
Digital Thermometer Selection Criteria |
| 1. | Calibration
Setting: Can the thermometer's reading be
altered? |
| |
Most thermometers do not
provide a correct reading straight out of the box... this
includes thermometers that are calibrated at the factory.
For best results, choose a thermometer that can be
calibrated and the reading adjusted. |
| 2. |
Submersible: Can the thermometer be submerged in an ice water bath? |
| |
Within the home environment,
using an ice water bath is the best method for checking a
thermometer's reading. If a thermometer cannot be submerged
in an ice water bath, then the reading cannot be verified. |
3. | Temperature Range: Does the thermometer read down to 32.0°F? |
| |
Within the home environment,
using an ice water bath is the best method for checking a
thermometer's reading. If a thermometer cannot read
down to 32.0°F, then the reading cannot be verified. |
| 4. | Accuracy:
Does the thermometer have an accuracy of ±0.5°F? |
| |
A thermometer's accuracy rating
reflects its acceptable error range meaning if a thermometer
has an accuracy of ±2.0°F and reads 99.5°F, then the actual
temperature may be anywhere between 97.5°F and 101.5°F. For
best results, choose a thermometer with an accuracy of no
less than ±0.5°F. |
| 5. | Response Time:
How quickly does the thermometer reflect temperature
changes? |
| |
Thermometers encased in plastic
often respond very slowly to temperature changes... we do
not get an immediate response. Alternately, some of the more
accurate thermometers respond too quickly to changes
resulting in readings that bounce around. We want something
that responds quickly, but not too quickly. |
|
|
|
|
WARNING: Do not confuse the difference between
Celsius and Fahrenheit. Some manufacturers list their
accuracy as ±1° likely meaning ±1.0°C that translates into
±1.8°F. 0.5°C translates into 0.9°F. If the
specifications are not perfectly clear, do not purchase.
|
|
|
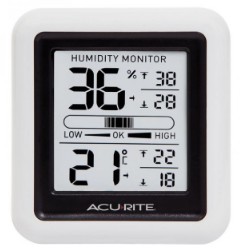
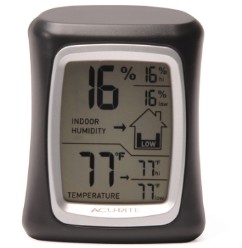
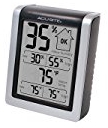
| |
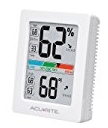
AcuRite 00613 |
AcuRite 01083 |
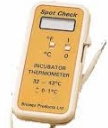
Brinsea Spot Check |
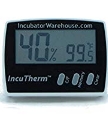
IncuTherm |
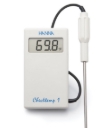
CheckTemp 1 |
SensorPush |
 |
 |
 |
 |
 |
 |
| Calibration Setting: |
No |
Yes |
No |
No |
Self |
No |
| Submersible: |
No |
No |
Yes |
No |
Yes |
No |
| Temperature Range: |
32° to 122° F |
-4° to 158° F |
90º to 104ºF |
Unknown |
-58.0 to 302.0°F |
-40°F - 140°F |
| Accuracy: |
± 2°F |
± 0.5° F |
± 0.2ºF |
Unknown |
±0.5°F |
±0.5°F |
| Response Time: |
Up 30 minutes |
Up to 8 Minutes |
Rapid |
Unknown |
Instant |
1 Minute |
| |
 |
 |
 |
|
 |
|
|
|
 |
TIP: When purchasing a
digital thermometer, be sure to carefully read the product
description and specifications. Reading several customer
reviews may be helpful in identifying major characteristics.
If a specification such as accuracy cannot be identified,
then do not purchase the product. |
|
|
|
|
TIP: Customer reviews
are helpful in revealing negative traits that the
manufacturer attempts to hide. Select only thermometers with
several customer reviews paying close attention to the
negative comments. It's best to discover potential problems
before you buy rather than on hatch day.
|
|
|
|
Calibrating a Thermometer |
| Freezing Point |
Boiling Point |
- Fill a glass with crushed ice cubes and cold water.
- Stir the water and let sit for 3 minutes.
- Stir again, then insert your thermometer into the glass, making sure not to touch the sides.
- The temperature should read 32°F (0°C).
- If it doesn’t, loosen the glue holding the glass to the scale, move the glass up or down as needed.
For digital models, follow the instruction manual.
- Recheck accuracy and secure the tube.
|
- Boil a pot of distilled water.
- Once the water has reached a rolling boil, insert your thermometer, making sure not to touch the sides or bottom of the pot.
- The temperature should read 212°F (100°C).
- If it doesn’t, loosen the glue holding the glass to the scale, move the glass up or down as needed.
For digital models, follow the instruction manual
- Recheck accuracy and secure the tube.
|
|
|
|
A Case for
Glass Thermometers |
| Lately, there’s been a great deal of focus on the best humidity settings for incubation and hatch. Unfortunately, far too many novices seem to blame humidity for poor hatch results. The more experience I gain, the more I believe that a healthy, vigorous chick will hatch regardless of the humidity settings…. temperature remains the most important key to a successful hatch.
Air Temperature: the air temperature within the incubator. Even with the most expensive incubator, air temperatures will consistently fluctuate (vary). The temperature will rise when the heating element comes on and then it will drop when the element goes off – frequently as much as a full degree (even more so with cheaper incubators). The more insulation and effective the air flow, the less the air temperature will vary. However, these variations only have a minimum impact on the developing embryo.
Realized Temperature: the temperature physically experienced by the embryo. The developing chick is insulated from the air temperature by its cuticle (bloom), shell, inner and outer membranes, and the albumen (egg white). Just as it takes time to boil a pot of water or freeze water in an ice tray, it takes time for the embryo to physically experience a rise or fall in air temperature. How quickly an egg’s temperature changes depends on factors such as humidity, air speed, and egg size.
Broody Hen Example: When a broody hen sits on a clutch of eggs, she is using conduction (touch) to transfer heat to the eggs with only one side being warmed at a time. A hen’s internal body temperature runs between 105-107°F and we can assume that the temperature of heated side of the egg is well above the 99.5°F that we commonly use in artificial incubation. That broody hen will turn her eggs up to 50 times a day so that no one side is heated/cooled for an extended period of time. From her example, we can learn that temperature variation is of less importance than the AVERAGE temperature physically experienced by the developing embryo – the “realized” temperature.
The Problem with Digital Thermometers: When I started back incubating a few years ago, I spent quite a bit of money on thermometers. Unfortunately, those expensive thermometers were useless in an incubation environment. In fact, most were detrimental (damaging) especially the most responsive ones like the renowned Brinsea Spot Check. You see, accurate and responsive digital thermometers react to even the slightest change in air temperature. When the heating element comes on, the reading rises. When the heating element cuts off, the reading drops. These variations caused me to fiddle with my thermostat… and fiddling with the thermostat with eggs in the incubator can cause all sorts of problems.
The Solution: Expensive digital thermometers do not work well for me. They accurately and precisely measure the “air” temperature but they aren’t very helpful in measuring the “realized” temperature. What I needed was a thermometer that reacted to changes in air temperature more slowly… one that measured the average air temperature… one that better represented the “realized” temperature. My solution was to return to the inexpensive, calibrated, red spirit filled thermometer (old faithful) I had first purchased at Tractor Supply shortly after my wife gave me a Little Giant incubator for Christmas. That thermometer responds to changes in air temperature but more slowly… more in line with what the embryo actually experiences. Since I returned to using old faithful, my babies hatch when they are they are scheduled – and that is the true measure of a good thermometer.
Lesson Learned: Newer and more expensive does not mean better. Since my Little Giant days, I’ve moved on to bigger and more expensive incubators; however, my good and faithful glass thermometer remains the cornerstone of my temperature monitoring. At this very moment, she sits in my hatcher constantly keeping vigilance over my hatching babies.
|
|
|
|
TIP: A glass thermometer need not be expensive. However, it MUST read down to 32°F do that it can be calibrated and it must be large enough to easily read. You can easily judge the accuracy of the glass thermometer… If chicks begin to hatch on day 21, then your thermometer is spot on.
|
|
|

Calvin & Cindy Roberts
488 County Road 335
San Augustine, Texas 75972
(936) 652-1940 • mail@robertsfarm.us |